조건문의 대표적인 문법은 if문이다.
사용빈도는 적지만 조건이 많다면 switch문이 로직을 보다 명료하게 보여줄 수 있다.
package org.opentutorials.javatutorials.eclips;

public class SwitchDemo {

	public static void main(String[] args) {

		System.out.println("switch(1)");
		switch(1) {
		case 1:
			System.out.println("one");
		case 2:
			System.out.println("two");
		case 3:
			System.out.println("three");
		}

		System.out.println("switch(2)");
		switch(2) {
		case 1:
			System.out.println("one");
		case 2:
			System.out.println("two");
		case 3:
			System.out.println("three");

		}

		System.out.println("switch(3)");
		switch(3) {
		case 1:
			System.out.println("one");
		case 2:
			System.out.println("two");
		case 3:
			System.out.println("three");

		}
	}

}
▼
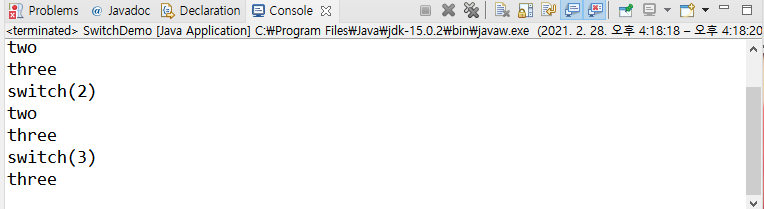
즉, switch 뒤의 괄호에 숫자로 1이 주어지면 case 1에 해당하는 로직 이후의 모든 case들이 실행된다.
package org.opentutorials.javatutorials.eclips;

public class SwitchDemo {

	public static void main(String[] args) {

		System.out.println("switch(1)");
		switch(1) {
		case 1:
			System.out.println("one");
			break;
		case 2:
			System.out.println("two");
			break;
		case 3:
			System.out.println("three");
			break;
		}

		System.out.println("switch(2)");
		switch(2) {
		case 1:
			System.out.println("one");
			break;
		case 2:
			System.out.println("two");
			break;
		case 3:
			System.out.println("three");
			break;

		}

		System.out.println("switch(3)");
		switch(3) {
		case 1:
			System.out.println("one");
			break;
		case 2:
			System.out.println("two");
			break;
		case 3:
			System.out.println("three");
			break;

		}
	}

}
▼
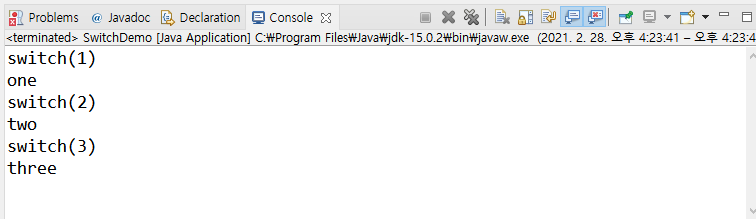
break를 만나면 switch 문의 실행이 즉시 중지된다.
따라서 위의 코드는 아래와 같이 if문으로 변경 할 수 있다.
▼▼▼
package org.opentutorials.javatutorials.eclips;

public class SwitchDemo2 {

	public static void main(String[] args) {

		int val = 1;
		if(val ==1) {
			System.out.println("one");
		} else if(val == 2) {
			System.out.println("two");
		} else if(val == 2) {
			System.out.println("three");
		}

	}

}
if문과 switch문은 서로 대체 가능한 관계다.
package org.opentutorials.javatutorials.eclips;

public class SwitchDemo {

	public static void main(String[] args) {

		System.out.println("switch(1)");
		switch(1) {
		case 1:
			System.out.println("one");
			break;
		case 2:
			System.out.println("two");
			break;
		case 3:
			System.out.println("three");
			break;
		default:
            System.out.println("default");
            break;
		}

		System.out.println("switch(2)");
		switch(2) {
		case 1:
			System.out.println("one");
			break;
		case 2:
			System.out.println("two");
			break;
		case 3:
			System.out.println("three");
			break;
		default:
            System.out.println("default");
            break;

		}

		System.out.println("switch(3)");
		switch(3) {
		case 1:
			System.out.println("one");
			break;

		case 2:
			System.out.println("two");
			break;
		case 3:
			System.out.println("three");
			break;
		default:
            System.out.println("default");
            break;
		 }

		System.out.println("switch(4)");
		switch(4) {
		case 1:
			System.out.println("one");
			break;
		case 2:
            System.out.println("two");
            break;
        case 3:
            System.out.println("three");
            break;
        default:
            System.out.println("default");
            break;
		}

	}

}
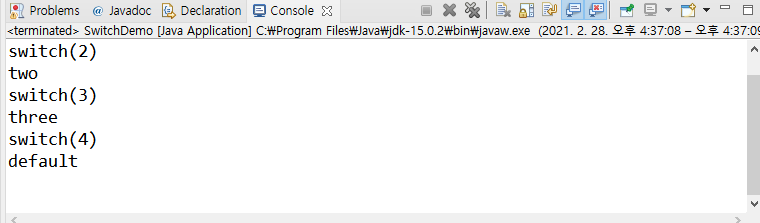
주어진 케이스가 없는 경우 default 문이 실행된다는 것을 알 수 있다.


